 (Face with Chequered pattern)
The first part of this was to create an unwrap UVW in the modifier list and select 'face'. As the symmetry mode is still present, any work that I did on the right side of the head would automatically get reflected onto the left side. I then coloured the side of my head using the paint marquee mode. I did not colour in the ear at this stage, as I would complete that later on. I then used the cylindrical mode in the map parameters section and arranged the cylinder so that it encompassed all of my model. So that I could see how I was stretching and arranging the material on the outside of my model, I applied a chequer pattern as this made it easier for me to see this. I then went into the 'edit' mode under the Parameters mode.
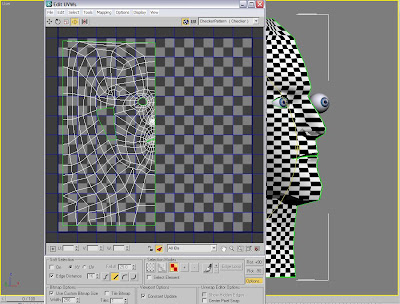 (UVW's in edit mode)
 The above image shows my face model within the edit mode for the UVW's. Within this mode I am able to move the corners of polygons around so that there are no triangles or shapes that I do not desire. This does not alter the model in any way, but instead re-arranges the chequer pattern that covers it. The aim of this exercise it to arrange the mesh so that all of the chequered squares are aligned correctly and that the lines that make the squares are relatively straight. This will give me a good image at the end when I map it onto my model.

(Model after editing the UVW's)
Once I had arranged all of the chequered squares, I then returned to the normal perspective view, which displayed the image above. As shown, most of the squares are now aligned and run in relatively straight lines. This should hopefully give me a good image when I come to mapping it onto it.

(Editing the ear)
Now that the head is ready for an image to be mapped to it, I then moved on to the ear, where I would do a similar process. Selecting the ear, I coloured it in red, then selected 'pelt' under 'map parameters' which stretched out the mapping over my ear, ready to be manipulated. I then selected the 'point to point seam' button and drew a line across the width of the ear, from the head to the outside of the ear (As shown in the image above).
As before, I then went into 'edit' mode again to move the corners of the various polygons around to make straight lines and accurate squares, similar to the way I did when editing the head UVW's.

(Editing UVW's on the ear)
When I entered the edit mode, the 'edit UVW's' dialogue box appeared. This is slightly different to the way I edited the head UVW's as I am in 'pelt' mode, which gave me the ring around the ear (called the stretcher), as can be seen in the image above. To manipulate the mapping on the ear, I used the rotate tool and rotated the stretcher around the ear. When I hit the 'simulate pelt pulling' button, this then stretched the ear according to how I arranged the stretcher around the ear. I continued this until there were no more overlapping parts. I then closed down the UVW editor.

(Head and ears in UVW edit mode)
Within the 'edit' mode of the parameters tab, I am now left with the right side of my face and my right ear when I allow everything to be displayed. I scaled down the ear as it was a lot larger than the rest of my face, and moved it down to the bottom of the viewport. By going to 'view' then 'select inverted faces' or 'select overlapped faces' I could then highlight any areas where vertices overlapped. Next, I made sure that 'select element' was enabled and selected the mirrored image of my face. I then clicked on the 'mirror' icon which created an identical copy of my head, but facing the other way. I did the same for the ear. I then aligned the images of the head up so that both images met down the centre, without a gap in between. This left me with what you can see from the image above.
 (UVW Map in Photoshop)
I next created a new layer in photoshop and called it 'guide'. I then chose a bright blue colour and filled in the layer completely. I then copied the background layer (above) in to the 'quick mast' mode, which then gave me a selection of all of the various relevant lines when I exited quick mast mode.

('Guide' layer in photoshop)

No comments:
Post a Comment