 (Defining the eye area)
Before adding the eyes, I decided to create a little definition around the perimeter of where the eyes will go. To do this, I dragged new polygons in towards the middle of the eye from the ones around the edge. I then selected the edges of the polygons that were closest to the centre of where the eye will go, and arranged them so that they were closer to the middle of the head than the next set of lines out. This in turn gave me a ripple effect making the area around the eye protrude further than the area that will connect to the eyeball itself. This produced 3D eyelids on my model.

(Spheres added to make the eyes)
I then created a sphere in the left eye and positioned it where it needed to go, making sure that all of the head vertices were positioned as close to it as possible so that there were no gaps around the eye. Using the mirror tool, I then copied the eye into the other socket to give me both eyes.
 (eyes complete)
The last stage was to find an image from the internet that I could use for the eyes. I found this image:
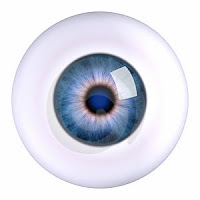
I then played with this in Photoshop so that there was no longer any edge around the eye. In effect, I simply used the blue retina and pupil, and created behind it an off-white background. I then went to 'Image - Adjustments - Hue/Saturation' where I was then able to play around with the hue, saturation and lightness so that the photoshop image resembled my eye both in looks and colour/lightness. This was then ready to be mapped onto my 3D eye model.
Using the material editor, I imported the image of the eye into my 3D Studio Max file in the specular view. I then dragged and dropped this onto my eye which then mirrored it onto my other eye. Clicking the show map in viewport icon, I could then view the eye on the sphere that I had created. I need to offset this image slightly as it did not appear in the centre of the eye as I wanted it to. Once the image of the eye was positioned correctly I then TurboSmoothed the model again to check that everything was as I intended it to be.
Additional detail (19th Oct)
As the eyes appeared too bright, they did not look correct on my model. As such, I went back into the photoshop eye and reduced the white background colour to a more greyish colour. I also added some red lines to make the eye look more realistic and reduced the colour of the iris by editing the Hue/Saturation. I was left with the result below, which looks a lot more realistic.


No comments:
Post a Comment