 (Part 1 of the topology lines)
Creating the ears are a very similar process to the way in which I created the face. First, I had to draw the initial topology lines around my ear in photoshop, following the contours and direction that my skin goes, and also tracking the main characteristics of the ear.
 (Part 2 of the topology lines)
Having created the blue lines in photoshop, I then created the main red lines which will eventually be used to create the polygons in 3D Studio Max. My main aim for the red lines was to create only four sided objects, and not have any triangles. You can also see from the image above that I have ensured smooth curves to flow around the ear.
 (Creating the polygons in 3D Studio Max)
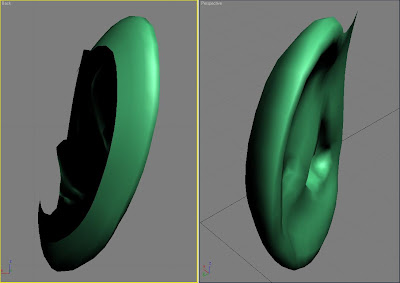
(Converting the polygons to a solid object)

Similar to the way in which I pulled each vertex out individually to their correct position using the front view when creating the face, I was able to create a 3D model of my ear in similar fashion. I focused on pulling out certain vertices where the ear protrudes most, mainly around the hole in the ear and at the back of the ear. This has proved to be the most difficult stage of the project, as there were some vertices in the middle that needed to be pulled further across to the right than the vertices at the front, meaning that some of the vertices were very close and I really struggled to do this without getting confused where all of the vertices were.
Next, I used the left view to select the 8 polygons that covered the hole of my ear. I then used the chamfer tool, with a setting of 2, which created a duplicate line around them. I was then able to use the front view to drag these polygons into the ear (to the right) which gave the effect that there was a hole going into my ear. I used this technique to also create the depth at the top of my ear.
(Adding depth to the ear)
Up until now, the ears have had no real depth to them. To add the depth, as can be seen from the images above, I selected the edges around the perimeter of the ear, and holding the shift key, I was able to add a row of polygons to create depth to the ear. I repeated this process, then using the select and non-uniform scale tool, I brought all of the last row of vertices in towards the middle of the ear. These vertices would then get attached to the head further down the line. I also ensured that all of the polygons were filled in, particularly the ones at the front of the ear which are also used to connect the ear to the head.

(Polygons added to ear)
The image above shows more clearly how I created new polygons in order to add depth to the ear. This also enabled me to have several vertices to use in order to connect the ear to the head. As the edges around the ear have been reduced to four sides in the middle, this then makes it a lot easier to attach it to the head.

(The final stage of the ear)
The final stage of the ear creation was to create a mirror image, so that I have one on both the left and right side. I ensured that both ears lined up correctly. I then pulled out the vertices around the ear ready to be attached to the face. Next, I attached the ear to the head using the attach tool, which then enabled me to weld the ear onto the head. As the ears were mirrored to each other, this made things a lot easier, because as I welded the right ear of the head, the left ear also welded at the same time. However, it was very difficult to locate every vertex of the head to the vertices of the ear, especially the ones that were located directly behind the ear itself. I am pleased with how smooth the ear has attached to my head and feel that this model is a good reflection of how my ear actually looks. It was very difficult getting all of the detail included in the ear. Some of my ear detail had to be simplified as it was too complicated to model it to a 100% accurate replication.

No comments:
Post a Comment